This comprehensive guide will walk you through the process of screen recording on your Mac. We'll explore both built-in methods and third-party apps, providing step-by-step instructions and tips to help you create high-quality screen recordings. Additionally, we'll discuss best practices, editing options, and troubleshooting common issues. By the end of this guide, you'll have a solid understanding of how to record your Mac's screen and share your recordings with others.
Record your Screen on a Mac with Audio in 3 Easy Steps

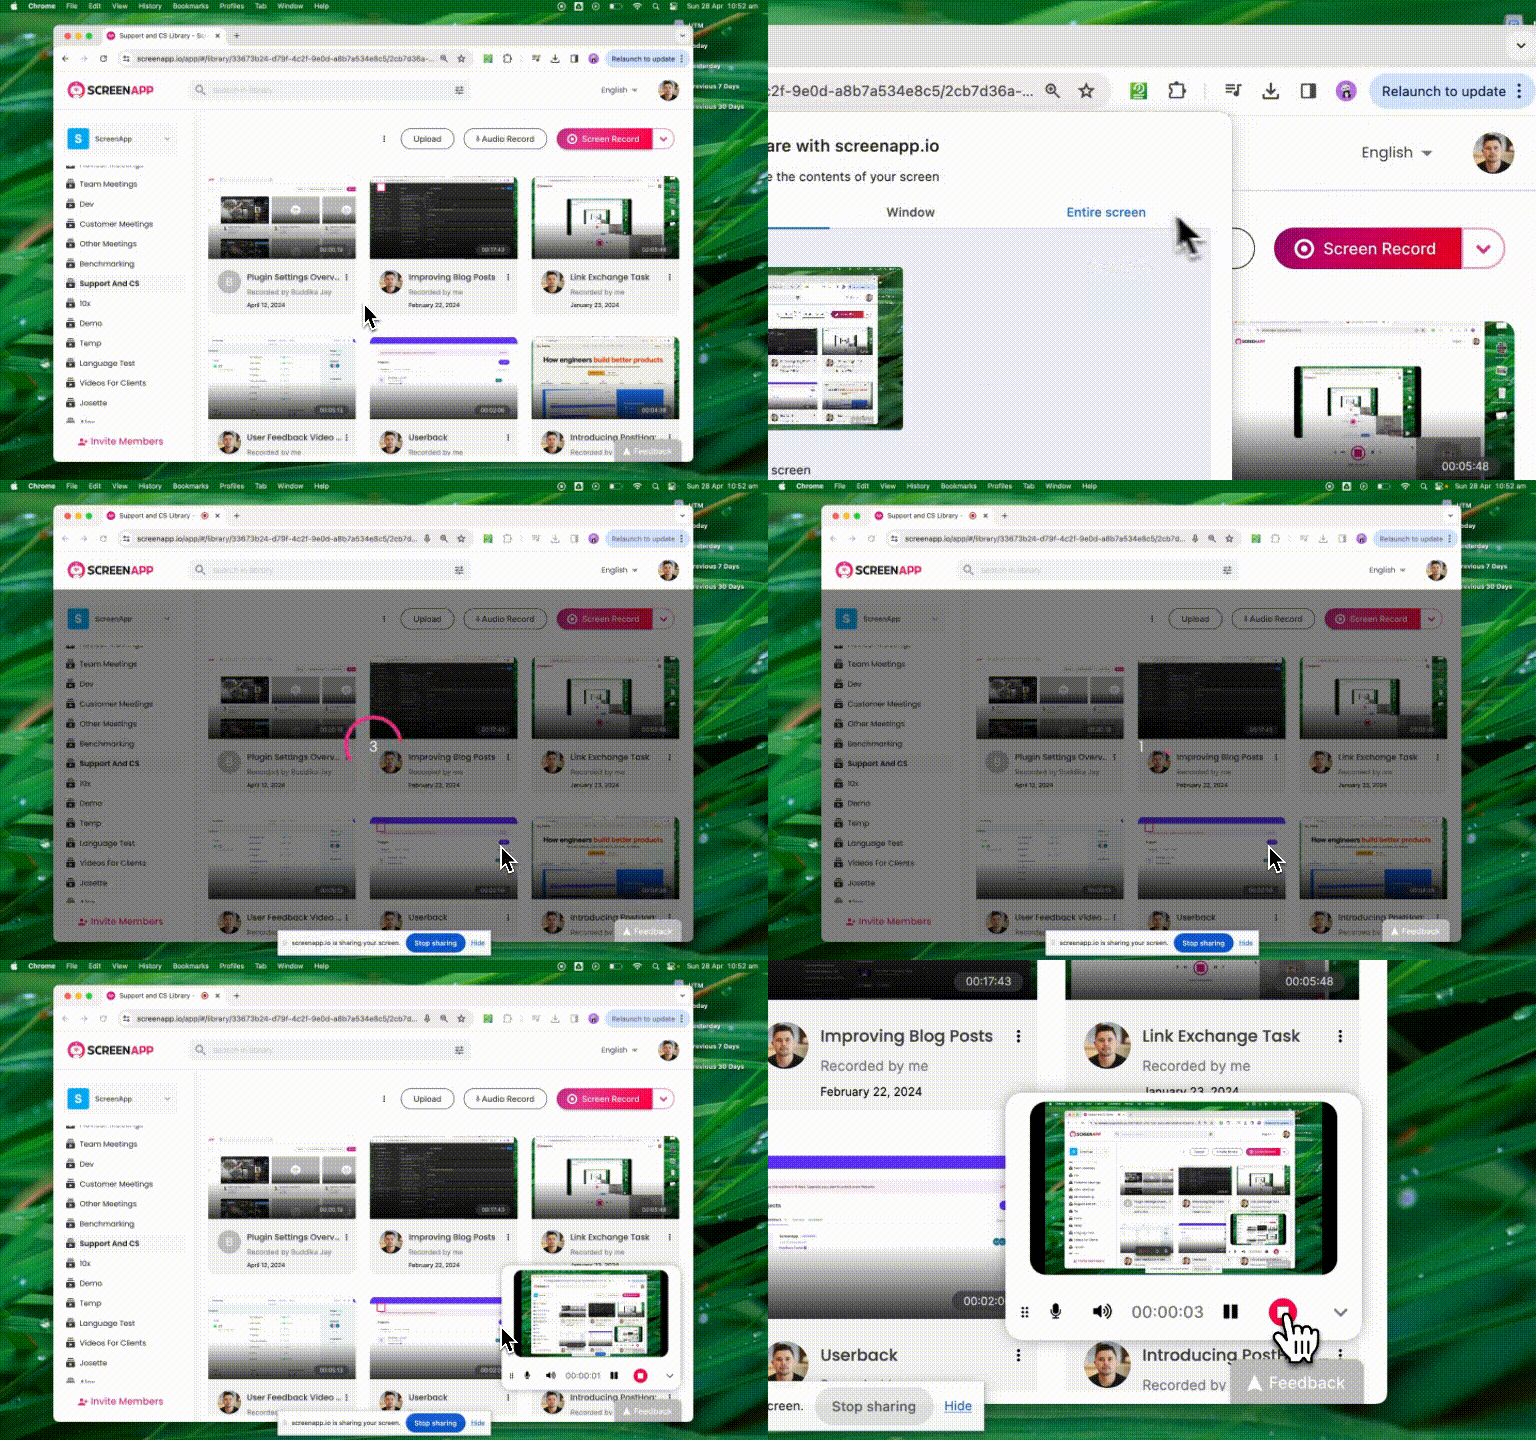
1. Signup for a free Screen Recorder Account
2. Click on "Record Screen" and Select Screen or Tab
3. Click "Stop" to Stop your Screen Recording
Built-in Mac Screen Recording Methods
Using QuickTime Player

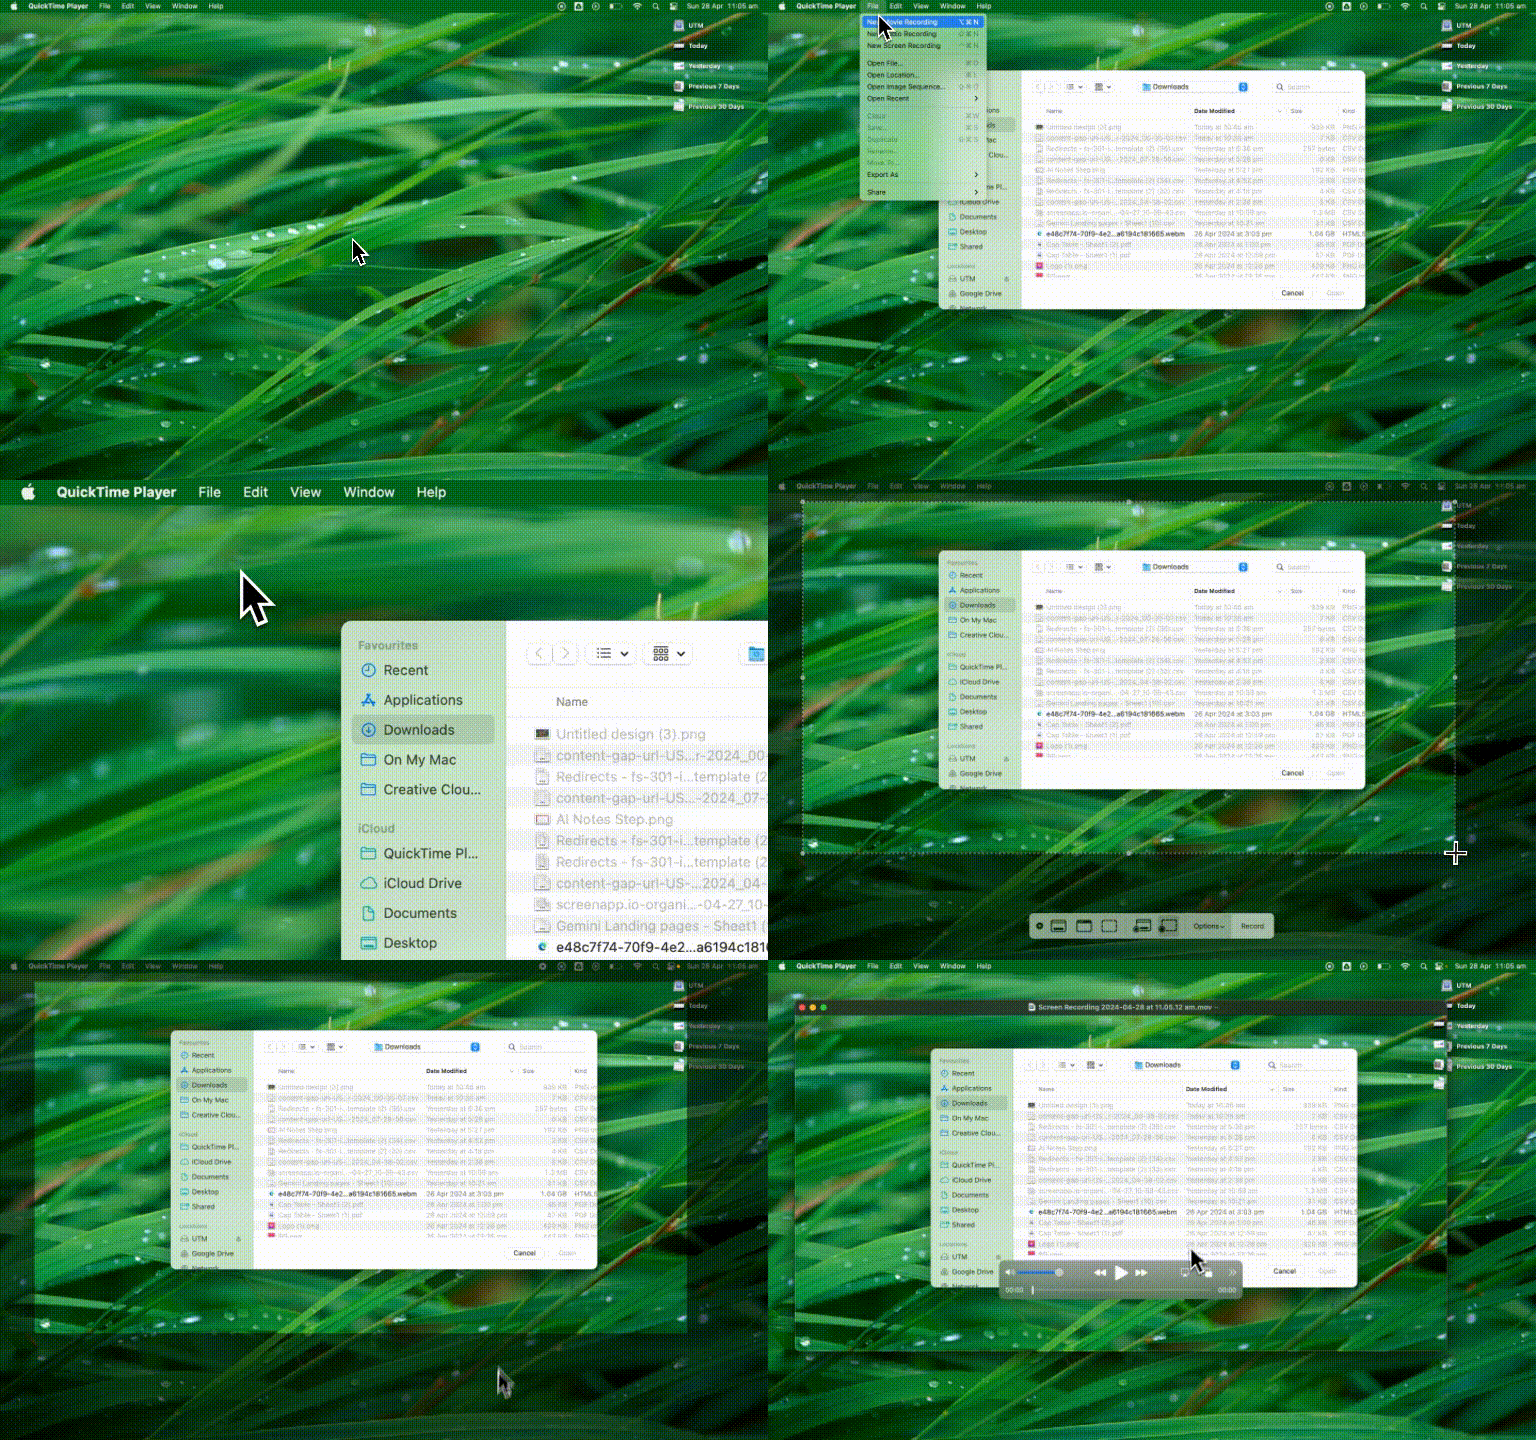
QuickTime Player, a pre-installed app on your Mac, offers a simple way to record your screen.Step-by-step guide:
- Open QuickTime Player from your Applications folder.
- Click on "File" in the menu bar and select "New Screen Recording."
- Click the arrow next to the record button to adjust settings, such as selecting the microphone for audio recording.
- Click the record button and choose to record the entire screen or a specific portion.
- Click "Start Recording" to begin.
- To stop recording, click the stop button in the menu bar or press Command + Control + Esc.
- Save your recording by clicking "File" and then "Save."
Pros:
- Pre-installed on all Macs
- Simple and easy to use
- Allows for audio recording
Cons:
- Limited editing options
- Lacks advanced features found in third-party apps
Using Screenshot Toolbar (for macOS Mojave and later)
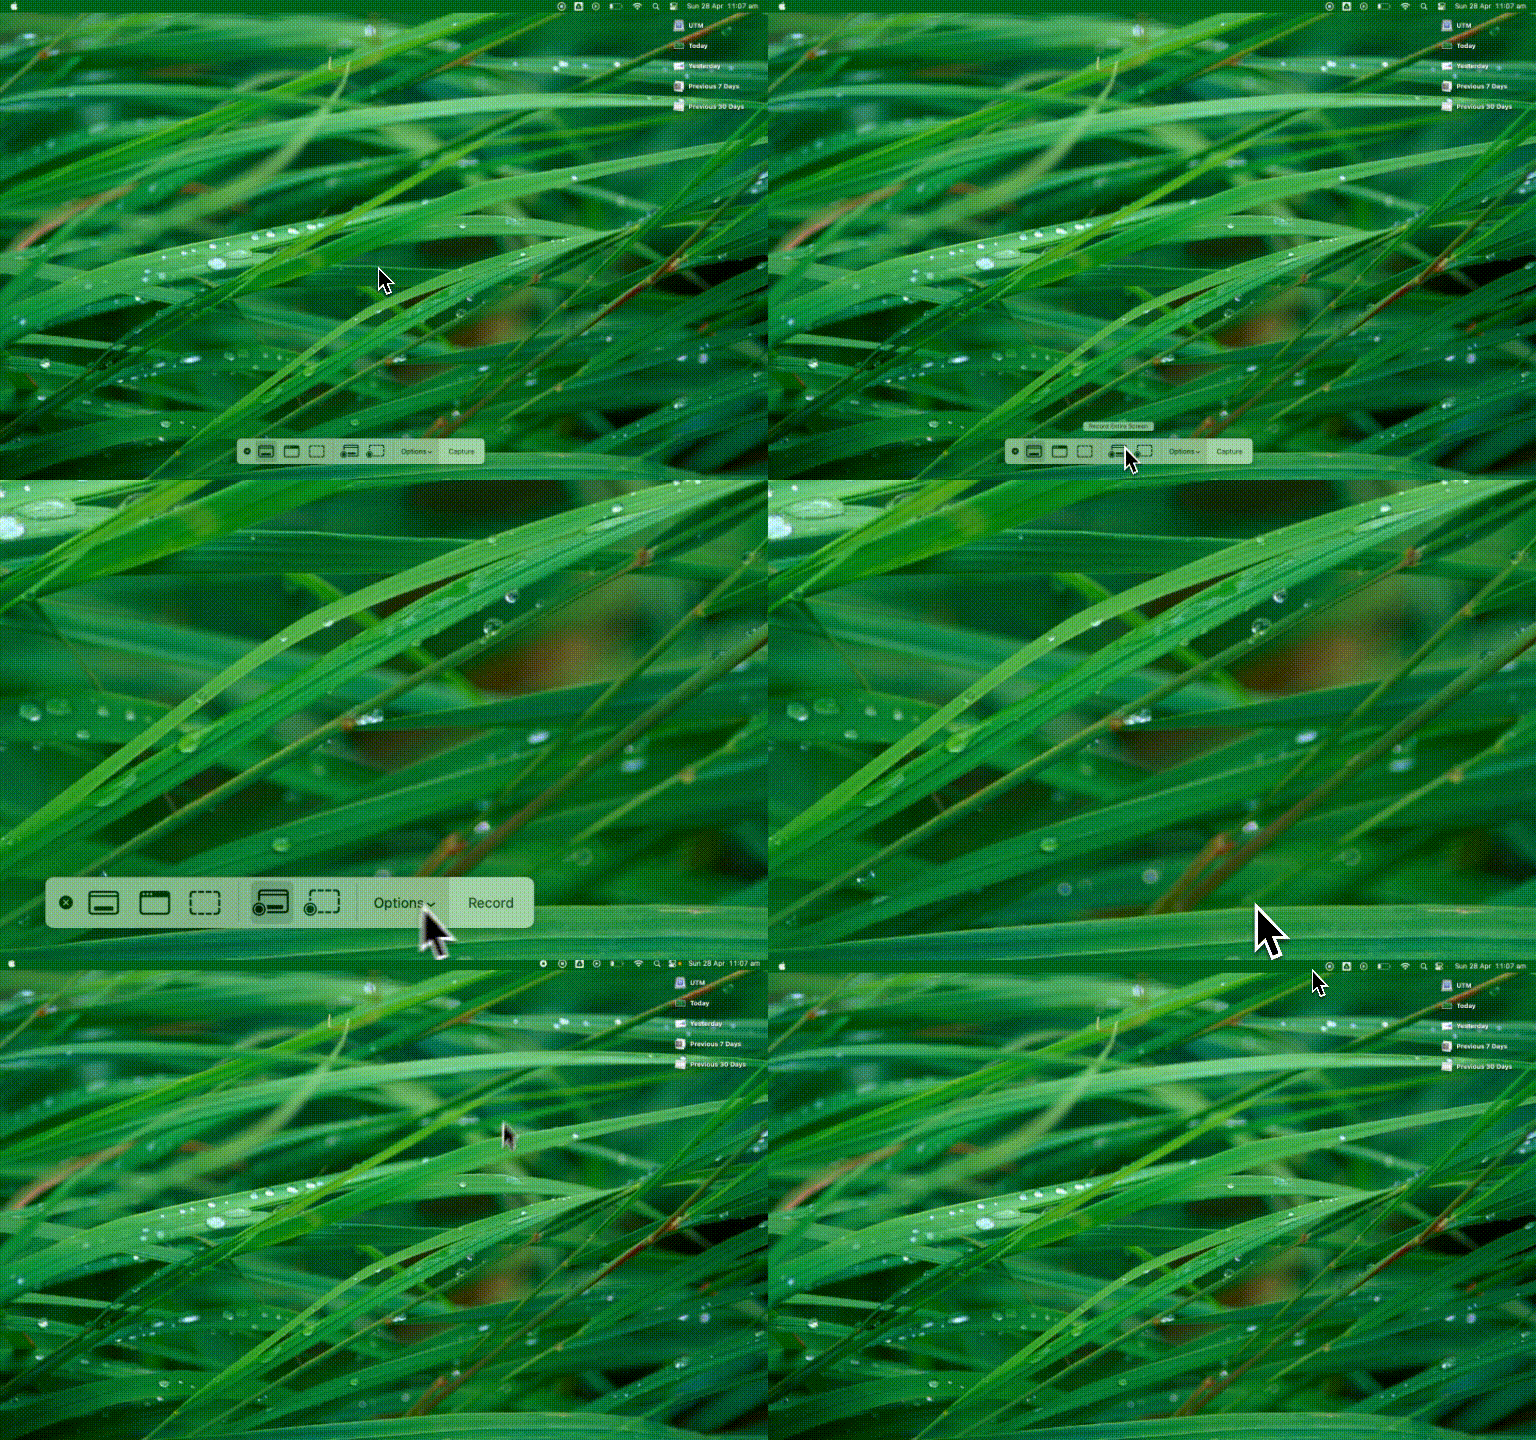
macOS Mojave introduced the Screenshot Toolbar, which includes screen recording capabilities.Accessing the toolbar:
Press Command + Shift + 5 to open the Screenshot Toolbar.

Recording options:
- Select "Record Entire Screen" or "Record Selected Portion" from the toolbar.
- Click "Options" to choose the save location, timer, and microphone settings.
- Click "Record" to start recording.
- Click the stop button in the menu bar or press Command + Control + Esc to stop recording.
Pros:
- Built-in feature for macOS Mojave and later
- Convenient access through keyboard shortcut
- Offers basic recording options
Cons:
- Not available on earlier macOS versions
- Limited editing options
Keyboard Shortcuts for Screen Recording:
- Command + Shift + 5: Opens the Screenshot Toolbar (macOS Mojave and later)
- Command + Control + Esc: Stops the current screen recording
Screen Recording Tips and Best Practices
Preparing your screen for recording
- Clean up your desktop and close unnecessary windows to avoid distractions.
- Adjust your screen resolution if needed for better clarity.
- Use a simple desktop background to keep the focus on the content being recorded.
- Disable notifications to prevent interruptions during the recording process.
Audio recording options
- Choose the appropriate microphone for narration, such as a built-in or external microphone.
- Ensure your microphone is properly connected and configured in your Mac's sound settings.
- Test your audio levels before starting the recording to ensure clear and audible sound.
- Consider using a quiet room or a microphone with noise-canceling features to minimize background noise.
Setting the recording area
- Decide whether to record the entire screen or a specific portion.
- If recording a portion, carefully select the area to ensure all relevant content is captured.
- Consider using a lower resolution or smaller recording area to reduce file size, if appropriate.
File formats and quality settings
- Choose a file format that balances quality and compatibility, such as MP4 or MOV.
- Adjust the video quality settings based on your needs and intended use:
- Higher quality settings result in larger file sizes but better visual clarity.
- Lower quality settings produce smaller files but may compromise visual quality.
- Consider the final destination of your recording (e.g., web, presentation) when selecting quality settings.
- Be mindful of storage space, especially when creating lengthy or high-quality recordings.
By following these tips and best practices, you can ensure that your screen recordings are well-prepared, properly configured, and optimized for your specific needs. Taking the time to set up your recording environment and choose the right settings will result in higher-quality and more professional-looking screen recordings.
Editing and Sharing Your Screen Recordings
Built-in editing options:
- QuickTime Player offers basic editing features, such as trimming the start and end of your recording.
- macOS Photos app allows you to trim videos and apply simple adjustments like cropping and rotating.
- Some third-party screen recording apps include built-in editing tools for annotations, callouts, and more.
Recommended video editing software:
- iMovie: A free, user-friendly video editor for Mac with features like transitions, titles, and clear audio editing.
- Final Cut Pro X: A professional-grade video editing software with advanced tools and features.
- Adobe Premiere Pro: Another industry-standard video editor with a wide range of features and integrations.
- Camtasia: A screen recording and video editing software specifically designed for creating tutorials and presentations.
Sharing options:
- YouTube: Upload your screen recordings to the world's largest video sharing platform for easy distribution and embedding.
- Vimeo: A popular video hosting platform known for its high-quality playback and professional features.
- Google Drive: Share your recordings directly with others by uploading them to your Google Drive and setting the appropriate permissions.
- Dropbox: Similar to Google Drive, Dropbox allows you to share your recordings through a link or by granting access to specific individuals.
- Social Media: Share your recordings directly on platforms like Facebook, Twitter, or LinkedIn for increased visibility.
Troubleshooting Common Issues
No sound in the recording:
- Ensure your microphone is properly connected and selected in your Mac's sound input settings.
- Check if the microphone is muted or if the volume is turned down.
- Restart your Mac and try recording again.
- If using an external microphone, try a different one to isolate the issue.
Low video quality:
- Increase the video quality settings in your screen recording software.
- Ensure your Mac's display resolution is set to the appropriate level.
- Close unnecessary programs and end tasks on Mac to reduce strain on your system resources.
- Update your Mac's operating system and screen recording software to the latest versions.
Large file sizes:
- Reduce the video quality settings or resolution to create smaller file sizes.
- Trim any unnecessary sections from your recording.
- Consider compressing your video using a video compression software or online tool.
Recording not saving properly:
- Ensure you have enough storage space on your Mac or external drive.
- Check the save location and ensure you have the necessary permissions to save files there.
- Try saving the recording to a different location or drive.
- If using third-party software, ensure it is up-to-date and compatible with your Mac's operating system.
Frequently Asked Questions about Mac Screen Recording
Can you screen record on a MacBook Air/Pro/iMac?
Yes, you can screen record on any Mac model, including MacBook Air, MacBook Pro, and iMac, using either the built-in tools (QuickTime Player or Screenshot Toolbar) or third-party apps.
How do I find my saved screen recordings on my Mac?
By default, screen recordings are saved to your Mac's Desktop. However, you can change the save location in the settings of your screen recording tool. If you can't find your recording, try using Spotlight Search (Command + Space) and typing in the file name.
How can I record my screen with audio on a Mac?
To record your screen with audio, select the appropriate microphone input in your screen recording tool's settings. Both QuickTime Player and the Screenshot Toolbar allow you to choose a microphone for audio recording. Ensure your microphone is properly connected and not muted.
Is there a time limit for screen recording on Mac?
There is no built-in time limit for screen recording on Mac. However, the duration of your recording may be limited by your Mac's storage space or the restrictions of the third-party app you are using. It's always a good idea to check your available storage before starting a lengthy recording.
Can I edit my screen recordings on a Mac?
Yes, you can edit your screen recordings using built-in tools like QuickTime Player or iMovie, or with more advanced third-party video editing software such as Final Cut Pro X or Adobe Premiere Pro. The level of editing features available will depend on the software you choose.
How do I share my screen recordings from my Mac?
You can share your screen recordings by uploading them to video sharing platforms like YouTube or Vimeo, or by using cloud storage services such as Google Drive or Dropbox. Most screen recording tools and video editing software also offer built-in sharing options for easy distribution.
What should I do if my screen recording has no sound?
If your screen recording has no sound, check your Mac's sound input settings and ensure the correct microphone is selected. Verify that the microphone is not muted and that the volume is turned up. If the issue persists, try restarting your Mac and recording again.
How can I reduce the file size of my screen recording?
To reduce the file size of your screen recording, try lowering the video quality settings or recording at a lower resolution. You can also trim any unnecessary sections from your recording or use a video compression tool to further decrease the file size.


